Producing music in Ableton Live is much more fun with a MIDI Keyboard. You don’t even have to be a keyboard player to benefit from a MIDI keyboard. Playing basic melodies, chords and drums on a midi keyboard is just more intuitive than clicking and dragging notes in a MIDI editor. In this short tutorial, you are going to learn how to set up a MIDI keyboard in Ableton Live with a few simple steps.
Step 1- Connect Your MIDI Keyboard to the Computer
Most MIDI keyboards are class compliant, which means they don’t require a driver to work with your DAW – in our case Ableton Live. However, if your keyboard does need a driver, be sure to download and install the latest version of the driver, before you open Ableton.
Now connect your MIDI keyboard to your computer. Most MIDI keyboards are bus powered, meaning they are powered through the USB cable. However, if your keyboard needs an external power supply, be sure to connect it.
Step 2 – Launch Ableton Live
After you have connected your MIDI keyboard to the computer, it’s time to launch Ableton Live. In most cases, Ableton recognizes the keyboard automatically and you’re all set.
You can test the MIDI connection the following way: When you press a key on the MIDI keyboard the MIDI indicator (a little square in the control bar, top right) should flash.
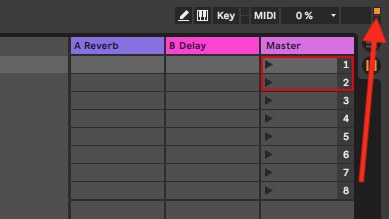
If it doesn’t – or if you want to customize some of the settings -, open the preferences menu under Live/Preferences… in the menu bar and select the “Link Tempo MIDI” tab on the left.
In the MIDI Ports section in the lower third, your MIDI keyboard should be listed as both input and output. For now, we are only interested in the input. Check the fields in the Track and Remote columns.

Step 3 – Load and Play an Instrument
Now close the settings menu. Create a MIDI Track and load an instrument. Now arm that track, if it hasn’t automatically done so. Now you should be able to play the instrument with your MIDI keyboard.
Bonus Step 1 – Instant Mapping
Some MIDI Keyboards like the Novation Launchkey series come with Instant Mapping. What that means is that the keyboard comes with pre configured MIDI mappings, so you can instantly control a bunch of other stuff than just notes with the keyboard.
For example, if your MIDI keyboard has pads, you would not only be able to finger drum with Abletons Drum Rack, but also launch clips in the Session View. Faders on the MIDI keyboard would be mapped to track faders. These are just examples and the integration can go a lot deeper or be a little different, depending on your keyboard.
Usually Ableton Live recognizes Instant Mapping automatically. Open the setting menu once more and choose the Link Tempo MIDI tab.
In the control surfaces section your MIDI keyboard should show up. If that’s not the case, choose your device from the drop down menu in all three columns (Control Surface, Input and Output).

Bonus Step 2 – Takeover Mode
The Takeover Mode determines how a knob or fader takes over a value already set in Ableton. I know this sounds very abstract but it should be clearer with the following example:
The level fader of a track is set to -8dB. The corresponding fader on your MIDI keyboard is at +5dB. Now when Takeover Mode is set to “none”, the software fader in Ableton will instantly jump to the hardware fader position, as soon as you move the latter.
Apart from the loudness jump that can occur, the big disadvantage of that behavior is that you can screw up your mix or other settings pretty easily. You may just want to make a tiny adjustment, but boom, you have a level jump that has nothing to do what was there before.
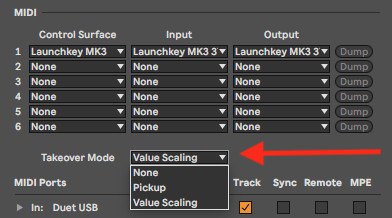
In Pickup mode things are a little more elegant. In our example, the software fader would not move until it is picked up by the hardware fader. The hardware fader must first pass the level of the software fader (in our case -8dB) to take over the latter.
Value scaling is probably the smoothest Takeover Mode. In our example the fader of the MIDI keyboard that is set to +5dB would be mapped to the -8dB of the software fader. So as soon as you move the hardware fader, the software fader moves accordingly, without a jump and without having to pickup the software value.
Now Play More and Program Less
Even if you are not a keyboard player, music production is a lot more fun with a midi keyboard. You program less and play more. On top most midi keyboards have pads and other controllers like faders and knobs, that expand their hands on functionality for the Ableton software. I hope this little tutorial helped you set up your midi keyboard in Ableton Live. If you still have any questions, please feel free to leave me a comment. I’ll be more than happy to help.