Mixing with headphones has several advantages over mixing on speakers. The biggest one is that there’s no bad room acoustics getting in the way. However, as the sound stays within your head, making mix decisions on depth can become difficult. Mix room emulation plugins claim to solve that problem. In this Waves Abbey Road Studio 3 review, we will see, if the plugin emulating one of the most legendary mixing rooms on the planet, holds up to its promises.
| This post contains affiliate links. If you make a purchase through these links, we may earn a commission at no extra cost to you. It’s a simple way you can support our mission to bring you quality content. |
What Is Abbey Road Studio 3?
The Abbey Road Studios in London are probably the most famous recording studios in the world. The fame comes in large parts from the Beatles album “Abbey Road” and it’s iconic cover. But it has remained its status as one of the top recording studios worldwide to this date.
The list of artists whose records were recorded and mixed in Abbey Roads’ Studio 3 contains such names as Kanye West, Frank Ocean, Amy Winehouse, Radiohead and Pink Floyd. So you would bet that Studio 3’s mixing room is top-notch, with great acoustics and awesome speakers.
Unfortunately only very few people on the planet have access to such a studio. Until now. Because the Waves Abbey Roads Studio 3 plugin brings the control room of Abbey Roads Studio 3 into your headphones. At least that is what’s being claimed by Waves and Abbey Road Studios.
The Goal Of This Review
Now let’s be clear upfront. Unsurprisingly I have never worked in Abbey Roads Studio 3 and cannot tell if the plugin reproduces the sound of that room in any way. What counts for me is if the plugin helps me when I’m mixing on headphones. I wanna know if it helps to create better mixes on headphones in any way.
Now that we are clear about the goal of this review, let’s have a look at the control surface of the plugin.
Two Pieces Of Software
Waves Abbey Road Studio 3 contains 2 pieces of software. First the plugin which emulates the mix room and second the Waves Head Tracker software. In short the latter tracks the movements of your head, so that the virtual speakers stay at their position, when you move your head.
Let’s stay with the actual plugin for now and save the whole head tracking thing for later, as this can be seen as an add-on to the mix room simulation.
Waves Abbey Road Studio 3’s Control Surface
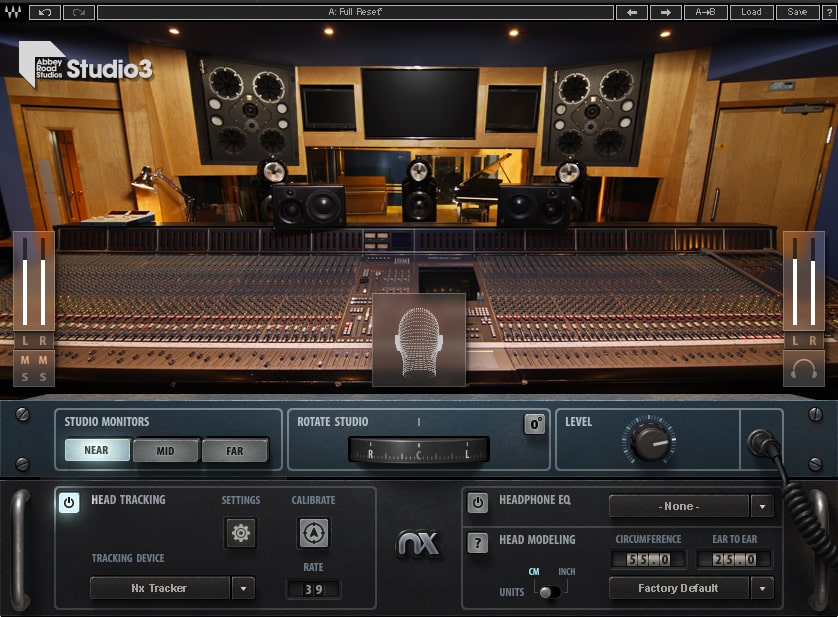
The control surface of the plugin is pretty straight forward and is divided into four sections. In the upper row, there is the Waves preset management and A/B comparison function, known from other Waves plugins. For the Abbey Road Studio 3 plugin this is pretty much obsolete. Well, you could save presets for different users, if you share the same computer with peers. But other than that, there is no use for presets here.
Below is an image of the mix room itself. This doesn’t have a function other than giving you a feel for the place you are virtually being beamed into by the plugin. It’s nice to have it, but once you’ve made your adjustments, you’ll probably close the plugin and let it do it’s work, while you mix and have other plugins open.
Integrated in the image of the studio are an input and output meter sitting left and right. At the center, there’s an image of a digital head, replicating your own heads movements, when the head tracking is activated.
Switch Between 3 Speakers
Below the studio image you have three buttons for the speaker selection, which are labeled NEAR, MID and FAR. This is the section you are probably going back to most often while mixing, to switch between the three pairs of speakers and hear if your mix sounds good on all of them.
Next there is a wheel called Rotate Studio. Moving this wheel let’s you rotate the studio view 360°, so you can have a look at the studios sides and back. This is a nice gimmick, because when you rotate the image, the sound rotates accordingly. Have a look at the back of Abbey Roads Studio 3 and the sound will come from behind you. I can’t find anything really useful in that feature. You’ll probably try it once for fun and then forget about it.
The last control in that row is a level knob which sets the output level of the plugin.
Head Tracking For More Realism
The bottom row of the plugin is divided in two sections. The left section contains all controls that have to do with the head tracking, while the right side contains a headphone EQ and the head modeling. Yep right, you can let the plugin model your own head, but we’ll come to that in a second.
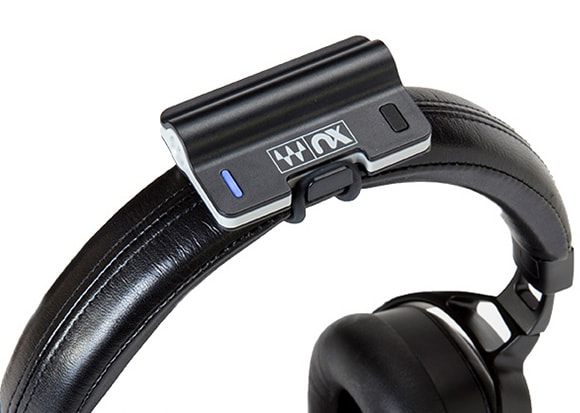
Let’s begin left with the head tracking section. Like mentioned above, the Waves Abbey Road Studio 3 plugin is able to track your head’s movements for a more realistic experience. This can be done via a camera, e.g. a webcam, or the optional blue tooth head tracker.
Now, like one would expect, you can choose between the two in the head tracking section via a drop down selector. There is also a settings button, which opens the Waves Head Tracker software for further adjustments.
Next there is a calibration button. When you click it, your actual head position is defined as the center position. Useful if the initial calibration took place, while you were looking to the side.
And last but not least you can switch the head tracking on and off. As the head tracking might not suit everyone’s taste and takes up some CPU power, this is a good thing.
Headphone Calibration & Head Modeling
Now to the headphones and head modeling section at the bottom right of the plugins control surface. First there is a headphone EQ, which is nothing else than a built in headphone calibration. It sort of evens out the frequency response for certain headphone models. Unfortunately there are only 12 models to choose from, which is by far not enough in my opinion. With so many headphone models available out there, chances are quite high that yours are not covered. At least they have put in some inexpensive “classic” models like the Sony MDR-7506 and the Sennheiser HD 280 PRO.
Below the headphone EQ, you’ll find the head modeling. This allows the plugin to adjust the sound to your head. You’ll have to make two measurements of your head and adjust the values in the plugin accordingly. There’s a video on the Waves website, which describes the process. It is pretty straight forward, but easier to show in a video than to describe in words.
But what is the purpose of the head modeling? We all have different heads with different size and different distances between our ears and therefore we all hear a little different. The Waves Abbey Road Studio 3 plugin includes that fact into the calculation of the emulated room sound. If you don’t enter any values the plugin simply takes the default ones, meaning their default head. I have to say that the difference between using my own head model versus the default one is subtle, but it’s definitely there. With my own values the sound widens a bit.

The Waves Head Tracker Software
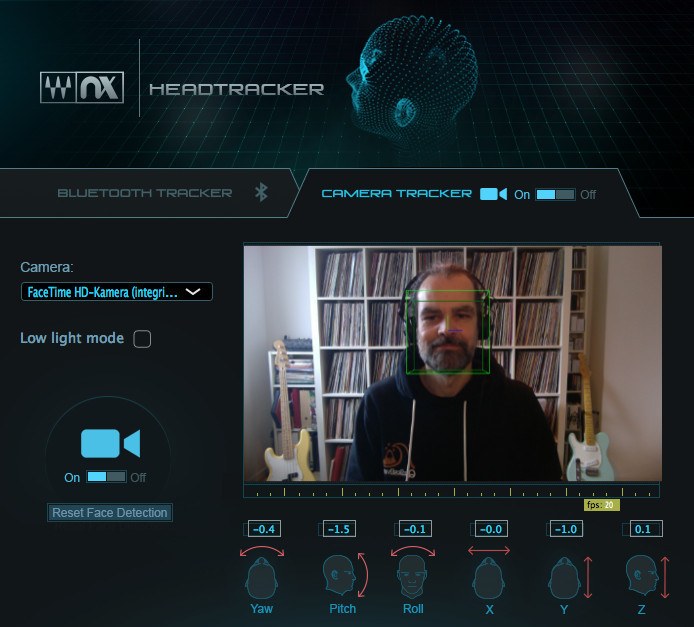
The Waves Head Tracker is what you see first, when you drag the Waves Abbey Road Studio 3 plugin on the master bus. When you have a webcam, you’ll see yourself and your head is gonna get surrounded by a thin green cube. That cube tracks your heads movements and makes the virtual speakers stick at their position accordingly.
There is not a lot to adjust. You can switch between the camera tracker and the Bluetooth tracker, which you can buy optionally. Like on the plugin itself, you can reset the face detection, in case the software caught your head in a skew position.
There is also a low light mode, which must be activated by hand if needed. When the light is low, the Head Tracker will have a harder time to follow your head’s movements, so the low light mode is very welcome. As we all know a lot of studio work is done in shady light.
Waves Abbey Road Studio 3 In Use
When I fired up the Waves Abbey Road Studio 3 plugin for the first time, was it instant MAGIC?
Well, no, not really. I didn’t hear that much of a difference. The sound changed somewhat, but it took a few minutes until I got a smile on my face and the impression of the sound coming out of my speakers.
It looks like the brain has to learn to be fooled by the plugin. Which is an interesting concept in itself. But let’s save that discussion for Gearspace or wherever you go when you feel the need to get nerdy:-)
OK, back to topic. So after a few minutes of listening to a track of mine and switching between the virtual speakers the whole illusion of listening to big speakers was kicking in. Wow!
Then, when I turned off the plugin, bah…the sound got super narrow and kind of stuck at my ears.
Switched it back on and the sound opened up again. And that smile on my face was back!
The head tracking adds to the illusion, though, at least with the camera head tracking, it’s not super accurate. It is pretty slow, so when you move your head fast, it takes a moment until the sound moves back to the speakers position. Like the speakers are attached to a rubber band rather than standing in a fixed position.
But as it turns out this is not that much of a problem, because when we produce or mix, we don’t wildly shake our heads left and right. (At least most of the time.) The movements are rather subtle.
The Virtual Speakers
The three speaker sets sound pretty different, but they all sound big. There is no such things as Auratones or a boombox you could check your mix on. You can only test if your mix sounds good on all of these three very hifi sounding speakers.
Like I mentioned earlier, the headphone EQ has only 12 headphone models to choose from. So if yours isn’t on the list it may make sense to buy a dedicated headphone calibration plugin such as Sonarworks Sound ID Reference For Headphones. My main headphones (Sennheiser HD-25) are not on the list, so I use the Waves Abbey Road Studio 3 plugin in conjunction with the Sonarworks. That combination works like a dream, but I would prefer if Waves had included a lot more headphones in their plugin.
At least they have some low cost models included, like the Sennheiser HD-280 Pro, which I also own. With that model, the EQ does a good job of turning that mid rangy sound of the headphones into a more balanced, wider sound with a bigger, more natural low end.
Compared to the Sonarworks calibration of the HD-280 Pro, I even liked the Waves Headphone EQ better. This doesn’t mean it’s more accurate. It just sounds more comfortable to my ears. So with these headphones, I would stay within the Waves Abbey Road Studio 3 plugin.
Attention Please!
One thing that makes using this plugin a little dangerous, is that you absolutely need to remember to switch it off when you listen to speakers (the real ones in your room) and when you bounce your mix! This is super important because if you leave it on, it will screw up you mix. You only want the processing while you are mixing on headphones. A speaker simulation on speakers doesn’t make sense.
Unlike other plugins of that kind, the Abbey Road Studio 3 plugin doesn’t warn you when you bounce and it’s still on.
The Ultimate Question
Now we know the Waves Abbey Road Studio 3 plugin is easy and fun to use. But the ultimate question is:
Is It Any Useful?
The fact that the plugin makes mixing on headphones more fun would be already enough reason for me to buy it. Music production should be fun. And I’m convinced that having fun brings better results.
But that’s not all. The Abbey Road Studio 3 plugin makes using headphones over a longer period of time a lot less fatiguing. And the sound coming out of the headphones is just more natural and doesn’t feel like the audio is slammed straight into your eardrums.
The headphone EQ helps mixes translate better to the outside world, provided that you own one of the 12 headphone models included. Fortunately they have included some inexpensive and fairly common headphones, but I really would like to see at least 10 times as much choice.
Although the head tracking with camera is a bit slow and takes some CPU usage, it still adds to the realism and I always leave it on.
Verdict
Waves and Abbey Road have teamed up once more and created a really inspiring and useful product. More and more people create music from their homes. That means that most music nowadays is not created in professionally treated studios, but in rooms that have all sorts of acoustic problems.
Acoustic treatment can be done to a certain degree in a home setup. But it takes time, knowledge and money to do it properly. You may even not have enough space to place acoustic elements in a proper position, due to furniture, instruments or equipment taking up that space.
This is were a software solution like Waves Abbey Road Studio 3 comes in and gives you a reliable mix environment out of the box. With headphones the potentially bad room acoustics of a home studio don’t play a role. And with the Waves Abbey Road Studio 3 plugin you don’t have to worry about headphone specific problems like quick ear fatigue and the absence of a sound stage.
I really enjoy producing and mixing with headphones and the Waves Abbey Road Studio 3 plugin. Before that using headphones was a bit of a pain in the butt, but it is something I need to do under certain circumstances. Cranking up the speakers with the sub in the middle of the night isn’t that good for the relation with my family.
Another big plus and at the same time the biggest miss of Waves Abbey Road Studio 3 is the headphone EQ. If you are the happy owner of one of the 12 headphone models included, than your mixes will probably translate a lot better, than without the headphone EQ.
But Waves should have included at least 10 times as many headphone models, so you would’t have to buy an extra pair of headphones that fit with the plugin, or another headphone calibration plugin like Sonarworks Sound ID Reference.
Anyway, Waves Abbey Road Studio 3 makes a real difference. It’s not just another sound shaping tool, but a plugin that solves a lot of the monitoring problems of most home studio owners. And it does it in a convenient and fun and affordable way.
I highly recommend you give it a try.
Click here to download your fully functional 7 day trial of Waves Abbey Road Studio 3
| PROS | CONS |
| Increases the fun of mixing with headphones Helps make better mix decisions Integrated headphone calibration | Headphone EQ supports only 12 headphone models Head tracking with camera a bit slow |


6 replies to "Waves Abbey Road Studio 3 Review"
Audio mixing and mastering software has been around since the early 2000s, but as of 2018, it has come a long way. New products are emerging that are designed to make your mixing and mastering efforts easier, especially if you’re working on music from home, in your own studio. One of these products is Waves Abbey Road Studio 3, which was released in April 2018. This is one of the few products that’s been endorsed by famous producers and artists, including Sir George Martin, who was the sound engineer responsible for many of The Beatles’ records including Sgt. Peppers.
Oh…I think you mean Giles Martin, Sir George Martin’s son, who is a music producer in his own right.
It’s true that audio plugins have come a long way. We could only have dreamt of such a plugin in the early 2000s:-)
What an interesting topic. I have to say, I don’t have experience with audio mixing – other than growing up in Brooklyn and having block parties where guys would mix on a turntable. That’s about it. But it makes sense you would need to be able to record music in a place where the acoustics were good or didn’t interfere. I’m amazed at how far audio mixing software has come. The Beatles are one of my favorite bands. I didn’t know Waves Abbey Road Studio was where they recorded. Thanks for the bit of history lesson here.
You’re welcome! And thanks for your interest:-)
Hey Marc, I’ve got both plugins and have been doing some research as to whether or not using them at the same time, and read some comments on how they’re different from each other in that ARS3 is intended to make things sound as if you were in that studio, whereas Reference 4 seeks to make sound as neutral as posible, and therefore they should be used simultaneously. Honestly, I don’t know what to think at this point, but I guess, since I can use both, I’m gonna take turns using each to have as many reference points as possible for my mixes and masters.
Hey Jo, it’s true that Abbey Road Studio 3 and Reference 4 are very different plugins. Like you pointed out, Abbey Road Studio 3 aims to simulate the sound of that studio on headphones, while Reference 4 is a headphone calibration software (making your headphones sound more neutral). I personally use them together. On my master bus behind every other plugin, I put Abbey Road Studio 3 to get the room simulation and then last I put Reference 4, which makes my headphones sound more neutral.
Note that the Abbey Road Studio 3 plugin has an integrated headphone calibration for a dozen headphone models. Of course this works only with the room simulation, so if you want your headphones sound as neutral as possible without the room simulation, you’ll need Reference 4.
But in the end, what counts is what works best for you. Feel free to try my setting (ASR3 and Reference 4 last on the master bus in that order). Chances are that your mixes translate better, than without the two plugins.