Parallel compression gets mentioned in about every mixing tutorial as the trick that makes records sound huge, and then the explanation stops at “blend a compressed copy with the dry signal.” That advice is true, but it’s also useless on its own. You can set up the bus correctly and still end up with a mix that sounds thicker but somehow worse, less punchy, more cluttered, with the kick drum fighting the bass and the vocal sitting on top of everything instead of inside it. The settings matter. So does the blend ratio, and so does which source you’re applying it to. This article covers all three.
What Parallel Compression Actually Does That Normal Compression Can’t
Normal compression reduces the volume of your loudest moments to bring the whole signal closer together. The problem is that it reduces everything, including the attack and energy that made the sound exciting in the first place. Squash a drum hard enough to get real density and you flatten the transient that gave it impact.
Parallel compression sidesteps that trade-off. Instead of compressing the only copy of the signal, you compress a second copy very hard, almost all the way to a flat line, and mix it under the original. The dry signal keeps its transients and dynamic range intact. The squashed copy fills in the space underneath, adding sustain, body, and perceived loudness without ever touching the attack of the dry track. You get density and punch at the same time, which is something a single compressor on one channel genuinely cannot give you, because that same channel can’t be both uncompressed and heavily compressed at once. Only exception: compressors with a dry/wet dial.

Setting Up A Parallel Compression Bus In Your DAW
The cleanest way to do this is with a send, not a duplicate track. Create an aux or bus track, route a send from your source (drum bus, vocal, bass, whatever) to that bus at full signal level, and put your compressor on the bus itself rather than on the source track. This keeps your dry signal completely untouched and gives you a fader on the bus to control exactly how much compressed signal gets added back in.
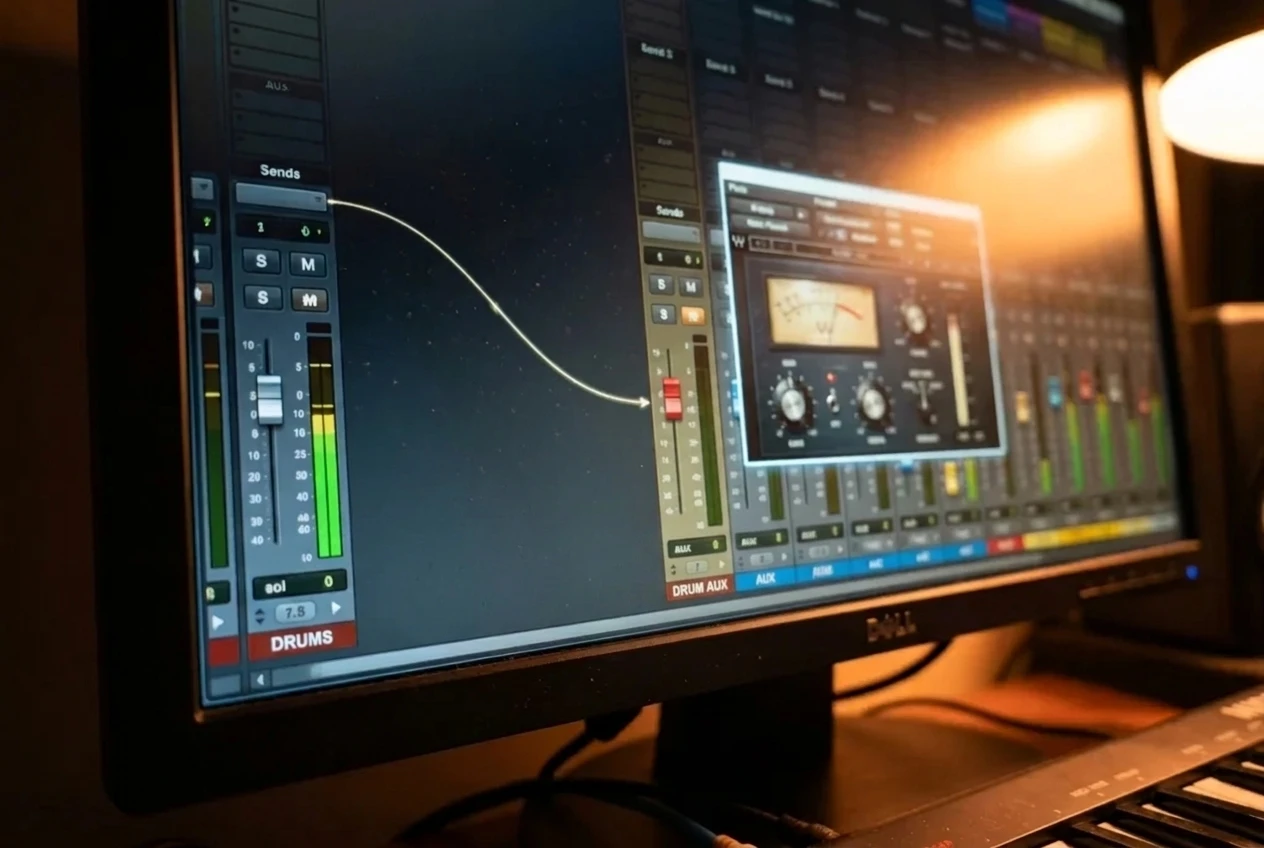
A few setup details that save you headaches later:
- Set the send to post-fader, so your blend stays consistent if you ride the dry track’s volume later.
- Name the bus something obvious like “Drums Parallel” so you’re not hunting for it during a session six hours in.
- If your DAW supports it, group the dry track and the parallel bus together so you can still mute or solo them as a pair.
As mentioned earlier, you can also do this with a single compressor plugin, as long as there’s a dry/wet knob built into the plugin itself. That works fine and is quicker to set up, but a separate bus gives you more control because you can EQ the compressed signal differently from the dry one, which matters more than it sounds like it should, and we’ll get to why in the muddiness section.
Dialing In The Squashed Signal: Ratio, Attack, and Release Settings That Work
This is the part most tutorials skip, and it’s the part that actually determines whether your parallel bus sounds good or sounds like garbage.
You want the compressor on your parallel bus set aggressively. A gentle 2:1 ratio with a high threshold defeats the purpose, because the compressed signal needs to be squashed hard enough that it behaves almost like a constant wall of sustain rather than a dynamic performance. Start here and adjust by ear:
- Ratio: 8:1 or higher. Some producers push this to a brick-wall limiter setting instead of a compressor. You want gain reduction of 15 to 20 dB on the loudest hits.
- Attack: Fast, but not instant. Somewhere around 1 to 10 milliseconds lets a tiny sliver of transient through before the compressor clamps down, which keeps the parallel signal from sounding like pure mush with no edge at all.
- Release: Fast enough to recover between hits so the compressor is pumping audibly. On drums especially, you want to hear the compressor breathing in time with the groove. That pumping is a feature here, not a flaw, because it’s what gives you the sustained, “glued” quality parallel compression is known for.
- Threshold: Low enough to trigger that 15 to 20 dB of reduction consistently, not just on the peaks.
If your compressor has a knee control, a soft knee tends to sound more musical on this bus because it’s already working so hard that a hard knee can sound clicky or harsh on transients.
Blending Dry and Wet Without Losing Your Transients
The blend is where most of the “mush” complaints come from, and it’s almost always a level problem, not a settings problem. People bring the parallel bus up until they can hear it clearly as its own thing, which is already too loud. You want the compressed signal to be felt more than heard.
A good starting point is bringing the parallel bus in around 10 to 12 dB below the dry signal, then nudging it up in small increments while listening specifically to the transient of the source. The moment the attack starts to feel soft, round, or less immediate, you’ve gone too far. Pull back until the punch returns, and that’s roughly your ceiling.
It helps to A/B with the parallel bus muted and unmuted rather than just listening to the blend in isolation. If the muted version sounds thin and the unmuted version sounds thick and still punchy, you’re in the right zone. If unmuted sounds thick but noticeably softer on the hit, bring the blend down two or three dB and recheck.
Parallel Compression On Drums: Getting That Thick, In-Your-Face Sound
Drums are where parallel compression earns its reputation, especially on a full drum bus rather than individual elements. Route your kick, snare, and overheads to a shared bus, then send that bus to your parallel compressor.

Settings that tend to work well here:
- Ratio: 10:1
- Attack: 3 to 5 ms
- Release: 50 to 80 ms, or set to auto-release if your compressor has it, since drum hits vary a lot in how fast they need to recover
- Gain reduction: 15 to 20 dB on snare hits
Blend the parallel bus in until you hear the room and sustain of the kit thicken up, especially on the snare’s tail and the overheads’ cymbal wash. The kick and snare transients should still crack through clearly. If the kick starts to sound like it’s being pushed backward in the mix instead of forward, you’ve likely got the blend too hot, or your attack time is too fast and is eating the very front edge of the hit.
Parallel Compression On Vocals and Bass
Vocals respond well to a slightly gentler version of the same idea, because you’re usually trying to add consistency and presence rather than raw aggression. A ratio around 6:1 to 8:1, attack around 5 to 10 ms, and release around 60 to 100 ms will thicken a lead vocal without squashing the life out of the performance. Blend it in carefully, maybe only 10 to 15 dB below the dry vocal, since vocals sit so exposed in a mix that over-blending becomes obvious fast, often showing up as a slight nasal or boxed-in quality, instead of sounding “thick” in a good way.
Bass is a slightly different case because low frequencies carry so much energy that a parallel bus can turn muddy in a hurry if you’re not paying attention to attack time. Use a ratio around 8:1, a slower attack of 10 to 20 ms so the initial pluck or pick attack survives, and a release around 80 to 120 ms to keep the sustain even across the note. The goal with bass is consistency of level from note to note more than added aggression, since an uneven bass line is one of the most common reasons a mix feels like it’s shifting in energy under the listener without any clear cause.
Why Your Blend Sounds Muddy (And How To Fix It)
Mud in a parallel compression setup almost always comes from one of three places.
The first is low-end buildup. Your squashed signal, because it’s compressed so hard, often reads louder in the low-mids than the dry signal does at the same fader level, simply because compression brings up the quieter frequency content along with everything else. Put a high-pass filter on your parallel bus, rolling off everything below 100 to 150 Hz on drums or vocals, so you’re adding thickness in the mids and upper mids without stacking extra low end on top of what your dry bass and kick are already providing.
The second is release time mismatched to tempo. If your release is too slow, the compressor never lets go between hits, and the parallel signal turns into a continuous smear rather than a rhythmic pulse that locks with the groove. Tighten the release and listen for the compressor pumping in time with the track.
The third is simply too much blend. It’s worth repeating because it’s the most common cause by far: if you can clearly hear the parallel bus as a separate, distinct layer rather than feeling it as added weight under the dry signal, pull the fader down. Thickness should feel like the mix got more solid, not like there’s suddenly a second drum kit or a doubled vocal playing underneath the first one.
If you’re still choosing which compressor to use for this, check out 6 of the best compressor plugins for beginners before you set up your bus.